


In the course of working on Flexible Neural Representation for Physics Prediction, we have developed a bunch of useful tools, most notably a NVidia FleX based simulation engine within the Unity ML Agents framework. The combination of FleX and Unity proofed to be a very powerful and rich training and testing environment which we would like to share with the AI community. FleX is capable of simulating a wide range of materials including rigid objects, soft bodies, cloth, inflatables, fluids, gases etc. which can all interact with each other. The possible combinations are sheer endless and only limited by your creativity. Unity’s ML Agents provides a nice and fast messaging interface, ways to parallelize data generation, and of course a set of reinforcement learning algorithms, which were less important for our setup, but might prove useful in future work.
Further reading: Flexible Neural Representation for Physics Prediction, Technical Tutorial and Implementation Details
In this blog post, we would like to guide you through installing, using and working with our NVidia FleX - Unity ML Agents setup, so you can try out your own physics experiments and train your own AI models. The general goal of this tutorial is to train a machine learning model on the FleX particle representation. If you have no experience with the FleX Unity plugin and / or ML Agents, we highly recommended that you have a look at the excellent tutorials provided by NVidia (FleX tutorials) and Unity (ML Agents tutorials). You will need a Windows machine to work with FleX in the Unity Editor but can compile a Windows or Linux binary to run it in headless mode. Whereas building a Windows binary is trivial, the “Building a FleX Linux binary” tutorial will guide you through the slightly more complex process of building a Linux binary.
A quick introduction into Unity and ML Agents
Unity is a popular game engine amongst developers. With the release of ML Agents, Unity is more and more used to simulate training data for machine learning and reinforcement learning in particular. There are numerous tutorials on how to use Unity and ML Agents in particular, which is why we will only introduce what is necessary to understand the usage of ML Agents in combination with FleX.
Having its roots in game development, Unity is organized into scenes. A scene usually contains several gameobjects. Gameobjects can be anything from lights, cameras, and physical objects to sound generators, data loaders or any other arbitrary script. Scripts are used to define the behavior of gameobjects and to extend their functionality. Development happens in the Unity Editor which allows for quick prototyping with the help of a drag and drop interface in concert with your favorite C# IDE, usually MonoDevelop or Visual Studio.
ML Agents is a framework built in Unity that enables games and simulations to serve as environments for training intelligent agents, usually through reinforcement learning. Basically ML Agents provides a simulated learning environment and an external communication interface that allows the environment to communicate with python-based deep learning frameworks such as Tensorflow or PyTorch. A learning environment consists of (1) an academy which orchestrates the overall experimental setup, (2) agents which generate observations, perform actions and assign rewards, and (3) brains which essentially contain the logic that is followed to carry out those actions. A scene may contain multiple brains e.g. to optimize for different goals and objectives. Multiple agents can be attached to the same brain e.g. to parallelize training.

To be able to follow this tutorial, we recommend that you at least complete the “Making a New Learning Environment” ML Agents tutorial in which a ball controlled by an agent is supposed to navigate towards a target cube. We will later setup a similar experiment, but this time based on the FleX physics engine instead of Unity’s standard physics engine.
The standard physics engine in Unity is PhysX, which is mainly used to simulate rigid bodies. Since we want to simulate different material types such as soft bodies, cloth or fluids, we will show you how to use the NVidia FleX Unity plugin in the following section.
The NVidia FleX Unity plugin
NVidia FleX is a powerful particle based physics simulation engine. As almost everything in the world can be broken down into particles and relations or forces in between them, FleX supports a wide range of materials such as rigid and soft bodies, cloth, fluids and gases. All objects can seamlessly interact with each other. NVidia provides a Unity integration of the FleX physics simulation engine in form of a plugin which can be downloaded at the asset store.
We will give you a brief introduction into working with the NVidia FleX plugin, but we recommend to watch the FleX tutorials for a full introduction. We will explain to you how FleX works with the example of creating a soft cube.
In Unity, FleX is organized into containers, actors and assets. A FleX asset is the actual particlized representation of an object created from its mesh. Given an object mesh, scale, and particle spacing, any closed mesh can be automatically particlized into a grid of equally spaced particles when a FleX asset is created. To put the asset into a Unity scene one needs to use a FleX actor which attaches the asset to a gameobject. One can think of the FleX actor as creating a link between the FleX asset and other properties of the gameobject through which its physical and rendering properties, such as position, deformation and speed, are changed. The actor also links the asset to a FleX container, which contains all assets that are supposed to interact with each other and controls how particle dynamics are resolved. The container is like a solver that takes all particle states and system constraints and computes the particle movement. Global physical properties governing the system are set in the container, local constraints and properties are set in the assets and actors. With this knowledge in our minds, let’s generate a soft cube in FleX.
After importing the FleX plugin into Unity, you will see the FleX shortcut appear in the context menu. First, right click in the Assets folder view to select a Flex container from Create→Flex→Flex container and set the settings in the advanced mode as follows:
- Radius: 0.125
- Collision Distance: 0.0625
- Planes: 1
- Plane 0: A: 0, B: 1, C: 0, D: 0
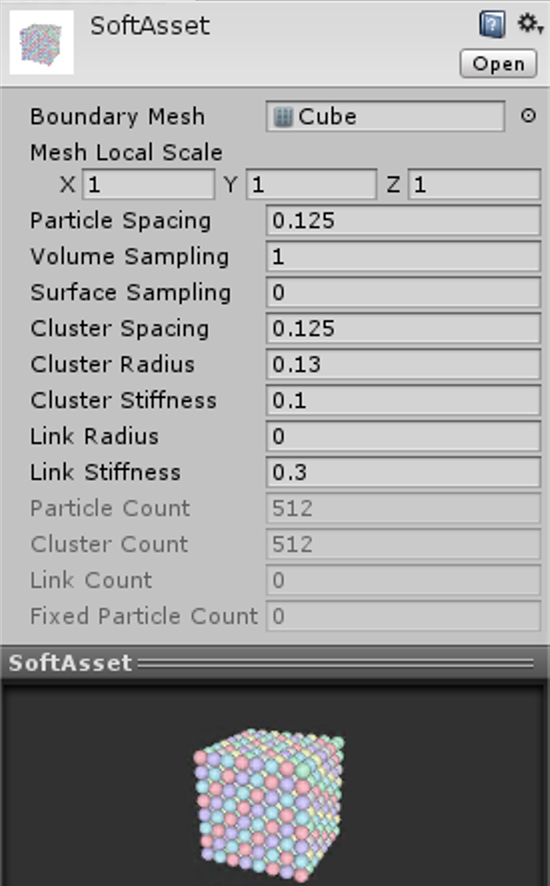
Next, create a Flex soft asset from Create→Flex→Flex soft asset. Select the cube mesh from the Boundary Mesh dropdown menu and change the other properties as seen in the screenshot of the soft asset settings.
Finally, create an empty gameobject in the scene by right clicking in the hierarchy menu and attach a Flex soft actor to it, by clicking on Add Component in the gameobject’s inspector view and searching for the Flex soft actor script. Attach the container to the actor’s Container field and the asset to the actor’s Soft Asset field by dragging and dropping the respective objects onto the corresponding fields. Enable Draw Particles to see the particles in the Game view. This is basically all you need to do to create a soft cube.
To actually see it deform, you can create a scene in which the cube drops on a plane. Therefore, you need to create a plane by right-clicking in the hierarchy view, and position the soft cube above the plane. Once you press play, you should see the cube deforming once it bounces off the ground.
That covers all the basics! If you want to create different types of objects or learn how to skin your soft cube with a nice deformable mesh and much more, follow NVidia’s FleX tutorials.
Using FleX with ML Agents
The general goal of this tutorial is to train a machine learning model on the FleX particle representation. The flex-ml-agents repository contains one such exemplary setup.
In this toy example, an agent controls a red cube, consisting of 8 FleX particles, and the task is to move the blue cube, also consisting of 8 FleX particles, without knocking it off the plattform. The agent has a maximum number of 100 steps to achieve the highest reward possible. It gets penalized with every time step and also if it knocks either the red or blue cube off the plane in which case the experiment is reset and the blue cube teleported to a new random position on the plane. This setup is implemented in the FlexAgent.cs and FlexAcadamy.cs scripts.
We will use the standard PPO setup in ML agents to train such an agent with the only model input being the 8 particle states of the red cube and the 8 particle states of the blue cube. Therefore, we need to extend the standard ML Agents setup to first construct a FleX particle scene and then to send those particles to the external brain trained in Tensorflow.
To construct a FleX particle scene, we first need to instantiate a Flex container with
FlexContainer flexContainer = ScriptableObject.CreateInstance<FlexContainer>();
Then we can fill this container with FleX assets.
To build a rigid FleX object from a gameobject with mesh and add it to a given Flex container programmatically in a script, the following code is used:
void AddFlexSolidActor(GameObject gameObject, FlexContainer flexContainer)
{
    // Build the solid flex asset
    FlexSolidAsset flexSolidAsset = ScriptableObject.CreateInstance<FlexSolidAsset>();
    flexSolidAsset.boundaryMesh = gameObject.GetComponent<MeshFilter>().mesh;
    flexSolidAsset.Rebuild();
    // Build the solid flex actor
    FlexSolidActor flexActor = gameObject.AddComponent<FlexSolidActor>();
    flexActor.asset = flexSolidAsset;
    flexActor.container = flexContainer;
    flexActor.drawParticles = true;
    flexActor.enabled = false;
    flexActor.enabled = true;
}
Calling Rebuild() as well as toggling the enabled flag are necessary to actually instantiate the Flex asset and Flex actor and load them into the scene. Also, this will only work if the boundary mesh is closed and scaled proportionally to the particle spacing of the asset. For instance, if the mesh is small compared to the particle spacing, it will be represented by only one particle, not allowing to distinguish the original mesh geometry from any other geometry.
As you can see in the FlexAcadamy.cs script, the AddFlexSolidActor() function is called to construct the red agent cube and the blue target cube.
Once the FleX particle scene is set up, we need to extract the particles from the Flex container and message them to the external Tensorflow machine learning model. In order to do that, we modified the original NVidia FleX Unity plugin to expose the particle state of all particles in the scene, namely their position, mass and velocity. We also made sure to assign an id to every particle identifying the object it represents. With these modifications sending the particle information to the Tensorflow model via the Vector Observation is trivial:
public override void CollectObservations()
{
    foreach (FlexActor actor in academy.flexContainer.actors)
    {
        for (int i = 0; i < actor.particles.Length; i++)
        {
            AddVectorObs(actor.particles[i]);
            AddVectorObs(actor.velocities[i]);
            AddVectorObs(actor.id);
        }
    }
    FillUpOberservationVectorWithDummyValue(-1.0f);
}
Please note that this code will not work with the original NVidia FleX Unity plugin as we needed to make modifications to expose the particle states that we are interested in transferring to our machine learning model. FillUpOberservationVectorWithDummyValue(-1.0f) in the last line is used to fill up the observation vector to a constant size, in case of a varying number of particles in the scene.
Lastly, the agent needs to be able to act on the particles of the red cube in order to move it around. Therefore, the action returned by the agent is transformed into an impulse on all particles of the red cube:
void ExecuteAction(float[] vectorAction, string textAction)
{
    Vector3 controlSignal = Vector3.zero;
    controlSignal.x = vectorAction[0];
    controlSignal.z = vectorAction[1];
    GetComponent<FlexActor>().ApplyImpulse(controlSignal * speed);
}
Note that the ApplyImpulse(Vector3 impulse, int particleId = -1) takes an optional particleId argument which allows to act on a single particle instead of all particles in an object.
To reset the scene when an episode ends, the red agent cube particles are teleported back to the center of the plane and the blue target cube particles are teleported to a new random location on the plane using the Teleport(Vector3 position, Quaternion orientation) method of the FlexActor.
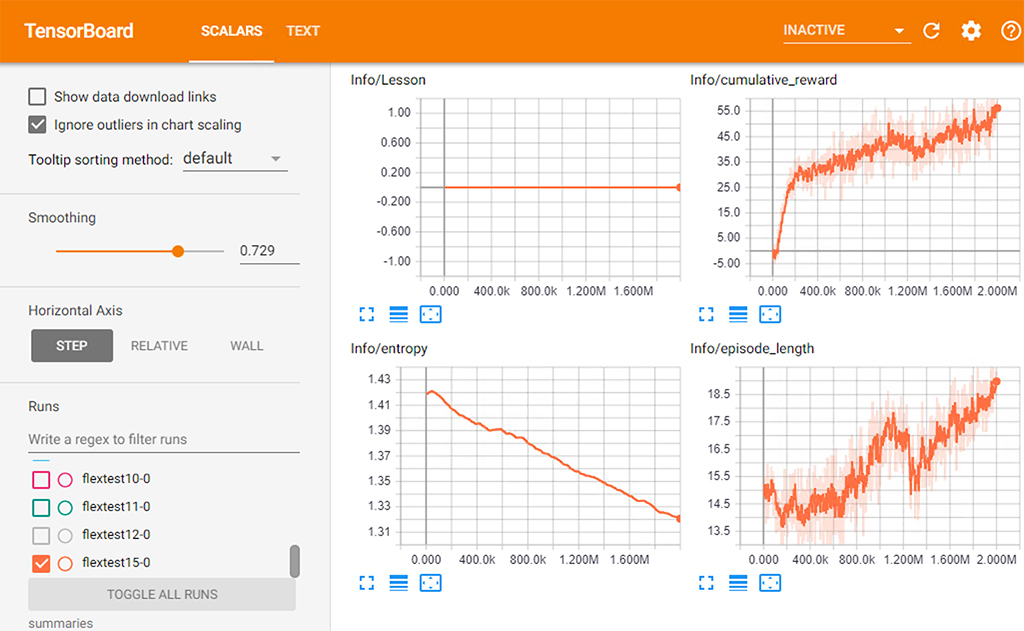
This is all we need to set up our “Use red cube to push blue cube” experiment, using FleX to represent the scene with particles and Unity ML Agents to perform the coordination and training. Checkout the FlexAgent.cs and FlexAcademy.cs scripts for the implementation of the full experiment. If you want to run the training yourself, you can open the UnitySDK Unity project in the flex-ml-agents repository in the Unity Editor, load the Flex scene from the Scenes folder and hit play after starting up the mlagents-learn command, just as you would do it normally in ML Agents. You should see the agent train and the cumulative reward increase.
This concludes this tutorial. Please cite our paper if you found it helpful or if you end up using the FleX ML Agents Simulation Environment.
@inproceedings{mrowca2018flexible,
  title={Flexible Neural Representation for Physics Prediction},
  author={Mrowca, Damian and Zhuang, Chengxu and Wang, Elias and Haber, Nick and Fei-Fei, Li and Tenenbaum, Joshua B and Yamins, Daniel LK},
  booktitle={Advances in Neural Information Processing Systems},
  year={2018}
}
Good luck with your own FleX ML experiments!
Further reading: Flexible Neural Representation for Physics Prediction, Technical Tutorial and Implementation Details